Monthly Archives: March 2014

March Garden Harvest

If only orange season lasted longer. The tree is bare, save for a last few remaining oranges.  We feasted on orange juice for the first half of March and sipped sparingly in the second half. Spinach parsley pesto was a huge hit this month, and I made three batches. The loquats are in full swing, but we have yet to get our loquat liqueur started. The chickens’ egg production picked up, while the asparagus yield remained disappointingly low.
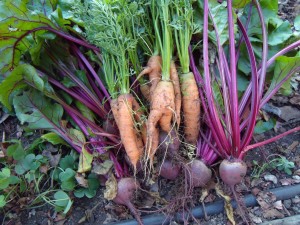
Onward to more carrots, beets, and peas in April. We also have a second round of cabbage, cauliflower, and broccoli in the ground.
March harvest totals
  • Asparagus ‘Farmer’s Favorite’: 1.69 lbs
  • Beets ‘Pacemaker III Hybrid’: 3.25 lbs
  • Broccoli ‘Rudolph’: .5 lbs
  • Broccoli ‘Umpqua’: .25 lbs
  • Cabbage ‘Copenhagen’: 4 lbs
  • Cabbage ‘Parel’: 2.5 lbs
  • Carrot ‘Nantes’: 2.13 lbs
  • Cauliflower ‘Snow Crown’: 1.5 lbs
  • Chard ‘Fordham Hook’: 2 lbs
  • Chard ‘Rainbow’: 2.5 lbs
  • Chives: .06 lbs
  • Cilantro: .5 lbs
  • Dinosaur Kale ‘Niro di Toscano’: .31 lbs
  • Eggs: 42 (Barred Rock 24; Barred Leghorn 18)
  • Fava bean ‘Superaguadulce Morocco’: 4 lbs
  • Fennel ‘Perfection’: 3.13 lbs
  • Kale ‘Winterbor’: 1.75 lbs
  • Kale ‘Wild Kale Blend’: .75 lbs
  • Lettuce ‘Heirloom Blend’: .88 lbs
  • Lime ‘Bearrs’: 5.75 lbs
  • Loquat: 5.75 lbs
  • Mustard ‘Ruby Streaks’: .06 lbs
  • Navel oranges: 48.88 lbs
  • Parsley ‘Dark Green Italian Plain’: 1.16 lbs
  • Spinach ‘Donkey’: 2.28 lbs
  • Snow pea ‘Oregon Sugar Pod II’: 4.88 lbs
  • Snap pea  ‘Sugar Snap’: 3.5 lbs
  • Spring onion ‘Purplette’: 3.25 lbs
  • Thyme: 1 sprig
  • White sage: 1.5 lbs

March harvest total: 108.71

2014 harvest total: 201.01 lbs

DSCN0022

What Do You Need to Make a Walk Away Split?

There are lots of approaches to dividing honey bee colonies. Our favorite is walk away splits. This method is cheaper and less complicated than purchasing or raising a queen to introduce. But the real reason we believe in walk away splits is that the bees get to select and raise their own queen.

In all aspects of our beekeeping, we attempt to meddle as little as possible in the life of the colonies, and we endeavor to cultivate locally adapted bees that are better at taking care of themselves without treatment or other human support/interference.

Walk away splits are simple (in theory) and give the bees a break in the reproductive cycle, and thus also a break from varroa mites.

The beekeeper’s only role in a walk away split is to transfer frames from the original hive into new boxes. The bees do the rest of the work. The key to this type of hive division is timing and ‘ingredients.’ In the ten minutes it takes the beekeeper to transfer frames from a strong hive into a new box, she must choose frames that contain key components and arrange them in such a way as to make it easier, not harder, for the new colony to raise a strong queen.

So what do bees need to raise a good queen?

 Eggs

Bees need eggs from which to raise a queen. The difference between a worker bee and a queen bee is a matter of nutritional variation early in development. All young larvae are fed royal jelly, but worker bee larvae are fed less royal jelly for a shorter period of time than larvae being raised for queens. It is safest to select frames containing eggs for the bees to rear a queen, rather than try to gauge the age of the larvae you see (since very young larvae can also be raised into queens with the right nutrition). By making sure the frames you choose for the split contain eggs, you guarantee that the bees will be able to select larvae of the correct age from which to raise queens.

Phew—what a mouthful!

A new split doesn’t need very many eggs for the bees to raise a queen. In fact, avoid including frames with lots of eggs or open brood, as this will force the bees to feed and care for many babies. Ideally, they should put most of their energy into caring for the developing queen or queens they are raising.

One frame of capped brood with a small patch of eggs is perfect for a walk away split.

Nectar

Excellent nutrition is critical to the survival of a young split.  Because most of the bees on frames of brood are young nurse bees, the new split will not have a strong group of foragers for some time, and it’s important that there is food in the split for the bees to survive on in the beginning. Nectar is an important nutritional component, so make sure it is plentiful in the split. Although honey works too, I have heard that including frames with curing nectar is even better where raising baby bees is concerned.

Two or three frames containing a combination of nectar and pollen should be sufficient for a walk away split. These important frames of food should be placed facing the frame with eggs, so that food sources for the young queen and her attendants are close at hand.

Pollen

Pollen contributes protein to a bee’s diet. Again, nutrition is key. If it’s possible to find frames with both nectar and pollen together, this is best.

Capped brood

Think of capped brood as future workers. Capped brood doesn’t need to be fed and tended to like bees in the larval (uncapped) stage of development. Capped brood is less labor and resource intensive for the nurse bees in the new colony. At the same time, it ensures that there will be an influx of young bees to the colony’s workforce within 13 days.

One or two frames of capped brood should be sufficient for a walk away split. All the brood should be together in the middle of the box. More capped brood can be added to make a stronger split.

Nurse bees

Hive divisions need lots of nurse bees. Again, the developing queen should have all the attention and care she requires, and the capped brood must be kept warm. Nurse bees are also more likely to stay in the new hive, rather than returning to the mother colony (which is often only a few feet away). No matter how many older foragers you add to a new split, they will find their way back to the original hive if it is close by. This is because, unlike nurse bees, foragers have already gone out into the world and oriented to the original hive’s location.

Select nurse bees by adding frames of capped brood (and a few eggs!) that are covered in bees. The bees in the brood nest should primarily be nurse bees. Because they are younger than foragers, nurse bees tend to be smaller.

Honey

We generally prefer not to supply our bees with sugar syrup feed, though this is often recommended for new splits. Instead, you can include an extra frame of honey to feed the bees until nurse bees have graduated to foragers.

How many frames to include in a split

We generally aim for at least five frames total in a walk away split (including a few frames of brood, and a few of pollen, nectar, and honey). We aim to include enough bees to cover these frames, keeping in mind that bees on frames of food stores may not be nurse bees and will probably return to the original colony.

If you want to add additional nurse bees, you can remove extra frames of brood from the mother hive and shake the attending bees into the new split. You can also always add extra frames of capped brood (covered in bees) to bolster the split’s population down the line.

Check out this post on how to tell when a hive is ready to split, or read about our first hive division last year, and splitting a hive the same day that it swarmed last spring.

Gauging Honey Bee Colony Readiness for Walk Away Splits

What makes a hive ready to divide, and how can you, the beekeeper, tell? Here’s what I go by when deciding if one of our hives is ready to split and ready to raise its own queen. And, if any of the beekeeping jargon below has your head spinning, take a look at our illustrated glossary of beekeeping.

Population

Is the hive ‘booming’? I look for bustle at the hive entrance, including bees orienting, bees arriving at the entrance with pollen, and a generally busy, productive vibe. Removing the outer cover, I look to see if there are bees visible (teeming, even) at the inner cover’s opening. I check out how the bees’ population seems within the hive. Are the frames covered in bees? Are the boxes full?

A good strong population in and of its self doesn’t mean the hive is ready to divide, but strong numbers are a must for making a walk away split. After a divide, both the mother colony and the new split(s) need to have plenty of bees to rebuild and raise a queen.

Nectar flow

If there’s lots of new, pearly white wax in the hive and bees tending to curing honey, there is a nectar flow in progress. This bodes well for hive divisions, as it means food is plentiful. Proper nutrition is essential for the bees to be able to raise a strong new queen.

Of course, it’s entirely possible to have a nectar flow on and a hive that’s not at all ready to divide. But I would hesitate to divide a colony if I don’t see signs that the bees are finding good forage and that they are currently supplied with stores to raise a queen.

Drones

The presence of drones and drone brood within the hive generally indicates that the colony is in its reproductive phase. An exception to this is hives in which there is a drone-laying worker (this can happen when the colony lacks a queen and a worker bee begins laying unfertilized eggs). In this case, all of the brood will be drone brood—not a good sign.

In spring, in a healthy colony, the queen will begin laying some drone brood before the hive swarms. If it’s spring, and you find drones milling about in the hive and patches of drone brood on the frames, the colony is in the process of reproduction.

Capped brood

Look for a ratio of about 90% capped brood to 10% uncapped brood in the hive. This is a sign that it is definitely time to divide the hive.

Before the colony makes its final preparations for swarming, the queen’s egg production slows. The bees are actually putting her on a diet to lose weight so that she will be able to fly with the swarm when it leaves the hive. Another benefit to the slowed egg production is that capped brood is less work for the remaining bees after a swarm to care for. Since the colony remaining in the hive after a swarm has its population cut by about half, the bees can put their energy into raising a strong new queen—not feeding uncapped worker bee brood.

Queen cells

This can be an obvious sign that the colony is reproducing and will soon, or has already, swarmed. It’s also possible the colony is in the process of replacing a failing or dead queen, rather than at the height of its reproductive vigor.

If you see queen cells, check out the above indicators to confirm preparation for swarming. Also note where the queen cells are positioned on the frame. Cells along the bottom edge of the comb are more likely swarm cells, while queen cells scattered in the middle of frames are often supersedure, or queen replacement cells.

It’s also worth looking to see if you can find eggs in the hive when you see queen cells. If eggs are present (and the brood isn’t all drone) you know that the queen has been in the hive within the last three days.

Also note what stage of development the queen cell is in and how much attention the bees are paying to it. If the bees aren’t milling around over the cell and looking like they have important business to attend to, it’s likely the queen isn’t viable, or that this is an old, un-hatched queen cell. If the bees are attending to it, you should too.

The presence of viable capped swarm cells is a definitive sign that the hive has already swarmed, or that it is about to.

Case study

I inspected one of our strongest hives on March 8th.  This is a colony that is seriously booming. The bees overwintered with four deep bee boxes, and we added a fifth in late February. That fifth box was teeming with bees on March 8th and was full of brood, capped honey, pollen, and nectar.
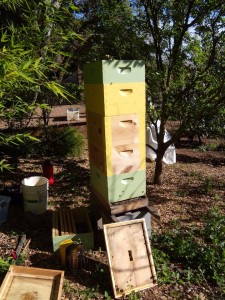
Mid-inspection, before adding the sixth box on March 8th.

The hive last year with a honey super on top. My camera ate my recent inspection photos.

I had come prepared to divide the hive, based on its huge population. I worked my way halfway through the fifth box and considered my Is the colony ready to split? mental checklist.

Population, check. Nectar flow, check. Drones, half-check (I saw a handful of drones, as well as a handful of drone brood cells, capped and uncapped). Capped brood, no check. There was certainly capped brood, but it was nowhere near 90% of the brood I saw. I also didn’t see any queen cells.

For the record, I actually prefer to split before the bees start raising a queen. Handling frames with capped queen cells entails a risk of damaging the queen. Also, once there are queen cells, it may be too late to prevent swarming, as the first swarm may have already left with a large portion of the colony’s population.

Based on the capped brood ratio, I decided the colony wasn’t quite ready, but I thought they were close. Because of the nectar flow and the prodigiously laying queen, I added a sixth box for the colony to move into and resolved to return in a week for another inspection.

It’s amazing how different a hive can look from one week to the next when it is ramping up in spring. I ended up splitting the hive today, and am second-guessing some of my decisions, but I’ll save all that for my next post.

Homemade Honey Orange Marmalade

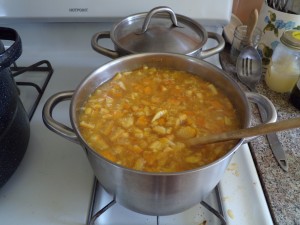
When we began harvesting navel oranges in earnest last month, I canned orange marmalade for the first time. The recipe is from our third edition copy of Stocking Up (1986), by Carol Hupping and the staff of the Rodale Food Center.

I was drawn to this recipe for its simplicity. Of the four ingredients, only the water wasn’t ‘local’ (i.e. from our own garden). The book calls it Bitter Orange Marmalade, and it is indeed quite bitter due to the inclusion of all of the fruit peel in the recipe. Maybe next year I’ll try a more traditional, sugary marmalade recipe, but overall I’m pleased with this one.

As I’ve mentioned before, I always hesitate somewhat to share recipes for canned goods. Please proceed at your own risk, and read up on canning safety at the website for the National Center for Home Food Preservation. The USDA offers a Complete Guide to Home Canning there. You can read about botulism on the CDC website. If you don’t feel comfortable canning, or have safety concerns, you can always make recipes to freeze or store short-term in the refrigerator.

Marmalade ingredients

  • 5 oranges
  • 2 lemons (I used Bearrs limes)
  • 3 cups honey
  • 12 cups water

Directions

  • Measure water into a large pot and add whole oranges and lemons or limes
  • Bring to a boil, then reduce to a simmer and cook for two hours
  • Saving remaining water, remove fruit, quarter it, and remove seeds
  • Chop fruit and return it to water
  • Bring fruit mixtures to a boil and add honey
  • Return mixture to a rolling boil and stir constantly for 15-30 minutes, or until the mixture has the consistency of a thick syrup (I had to stir and boil for about 45 minutes)
  • Leaving ¼ inch head space, pour marmalade into scalded half-pint jars and process for 10 minutes in a boiling water bath
  • Let the marmalade ‘age’ for at least two weeks before digging in

Enjoy! After dutifully waiting the recommended two weeks, we popped a jar open and started snarfing. I’ve been eating orange lime marmalade by the spoonful!

Yum!

Yum!

February Garden Harvest

We kept up our garden record keeping, but slacked off somewhat on our harvesting in February. It was a month of  orange wedges, orange juice, and canning orange marmalade. We neglected our greens, and the garden is overrun with spinach, lettuce, broccoli, mustard, and kale. Peas, beets, carrots, fennel, and asparagus are on their way in for March!

February harvest totals

  • Asparagus ‘Farmer’s Favorite’: .25 lbs
  • Broccoli ‘Rudolph’: 1 lb
  • Broccoli ‘Umpqua’: .56 lbs
  • Cauliflower ‘Snow Crown’: 5.63 lbs
  • Chard ‘Fordham Hook’: 1.25 lbs
  • Chard ‘Rainbow’: .63 lbs
  • Cilantro: .72 lbs
  • Eggs: 27 (Barred Rock 14; Barred Leghorn 13)
  • Kale ‘Dinosaur’: .38 lbs
  • Kale ‘Wild Kale Blend’: 1.13 lbs
  • Leek ‘King Lear’: 1 lb.
  • Lettuce ‘Heirloom Blend’: 1 lb
  • Limes ‘Bearrs’: 5.5 lbs
  • Mustard ‘Ruby Streaks’: .25 lbs
  • Mustard ‘Tah Tsoi’: .125 lbs
  • Navel oranges: 45 lbs
  • Parsley: .19 lbs
  • Spinach ‘Donkey’: .63 lbs
  • Spring onion ‘Purplette’: .88 lbs

February harvest total: 66.13 lbs

2014 harvest total: 92.3 lbs

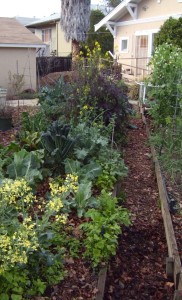
We've begun letting some of the brassicas go to flower, and the bees are loving it.

We’ve begun letting some of the brassicas go to flower, and the bees are loving it.

Welsummer and Ameraucana Chicks Join the Flock

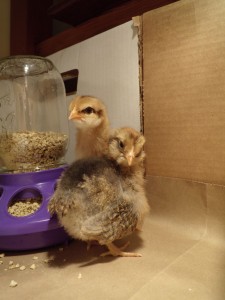
The somewhat frumpy, but utterly endearing Ameraucana is in the foreground, with the sleek Welsummer peering from behind.

The somewhat frumpy, but utterly endearing Ameraucana is in the foreground, with the sleek Welsummer peering from behind.

We’ve done it again! Two years after picking out our first backyard chickens, we brought home two new chicks this week. Of course, they’re just as stinky and ridiculous and adorable as the first batch.

As yet unnamed, the Welsummer appears to have clambered to the top of the pecking order and gave the Ameraucana a few sharp baby-pecks last night. For her part, the Ameraucana seems to be following in our Barred Rock’s footsteps; she is an eating machine!

We chose the breeds for a variety of reasons. For one thing, they were available this week at the feed store. Since we only wanted two, there is no way for us to order chicks through the mail, so the semi-local feed and fuel store is our go-to place for chicks.

In addition, as shallow as it sounds, we were drawn to these breeds’ egg colors. Welsummers lay dark brown eggs with speckles. Ameraucanas are known for their blue/green eggs.  As extremely small scale ‘chicken farmers,’ we have always enjoyed being able to tell the Barred Rock’s brown eggs from the Barred Leghorn’s white ones. With these new birds, we will maintain our ability to keep tabs on who’s slacking in the henhouse.

We also considered laying rates. From our rather limited research, it seems Welsummers lay about 160-180 eggs per year, while Ameraucanas lay in the range of 250-280 eggs per year. Unfortunately, we’ve only recently begun keeping proper records of egg-laying for the chickens we have now. Supposedly, Barred Rocks lay 250-300 eggs per year, while Leghorns (not sure about Barred Leghorns) lay in the range of 300-330 eggs per year. These days, just beginning their third year, both Luma and Petunia are laying about four eggs a week.

The Welsummer had better lay beautiful eggs and be fabulously healthy to earn her keep!