Monthly Archives: November 2013

Salting Fruit

We can, and dry, and ferment it, but we have never preserved fruit with salt. Maybe it’s the copious boxes of persimmons in the kitchen, or the buckets of pineapple guavas, or maybe it’s simply the chilly weather making me crave salty foods, but it came to me yesterday: I want to salt-cure fruit. Really, why not?

I turned to the trusty labyrinth of Internet recipes and came up short. Sprinkling salt on fruit? Sure. But packing fresh fruit in salt? Must not be tasty, ‘cause no one seems to have done it. The only reference I found to salt-cured fruit is an article on fruit cocktails.

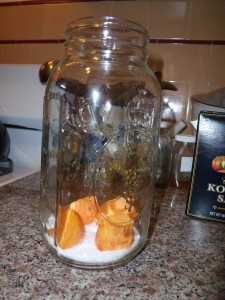
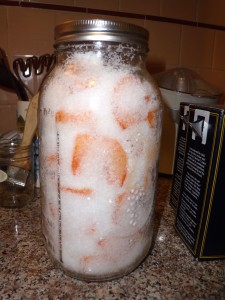
I decided to forge on. I used quart and pint canning jars, kosher salt left over from this summer’s fresh-pack dill pickles, and fresh fuyu persimmons and pineapple guavas.

I cut the persimmons into eighths and the pineapple guavas in half longwise. I poured a half-inch layer of salt into each jar before beginning to add fruit. I also made sure that all of the chunks of fruit were separated by salt. So far, so good. The jars are behaving themselves on the kitchen counter.

According to the cocktail article, it can take months for fruit to cure in salt. When the fruit is cured, the author describes steeping it in hot water and adding sugar. I am curious what other (palatable) uses salt-cured fruit may have beyond cocktails. I’ll keep you posted.

DSCN5556


DSCN5560

Really Simple, Low-Tech, Do-It-Yourself Washing Machine Gray Water

We like the idea of installing a gray water system, but we have lacked the plumbing smarts, financial resources, and home ownership (we have to run everything by the landlord) to make it a reality.

Now, however, due to a sewer backup, we are on our way to gray water bliss.

Let me explain.

A few weeks ago, while running a load of laundry in our hand-me-down water-inefficient washer, the toilets began making ominous gurgling noises, and sewage backed up into the shower. After calls to a plumber and the city, we thought the problem was fixed.

Last weekend, another load of laundry started the toilets gurgling and sucking all over again. Rather than tempt fate, Kelly stopped the load. But we really needed to finish the wash. And it was then, in a characteristic streak of brilliance, that Kelly landed on a solution that achieved both peaceful sewers and nearly 200 gallons of salvaged gray water (so far!).

I have to stop here and assure you that, as brilliant as she is, Kelly is no plumber. Neither does she have any special engineering or ‘handy-man’ training. This is really really simple, and if you’re in our position—hankering for gray water, while balking at the expense, trouble, etc.—you should give it a try!

How to make a (temporary) washing machine gray water system in five minutes

Materials (highly variable and flexible depending on your needs and what you have laying around): Length of four-inch PVC pipe, two flexible rain gutter extenders, two 96-gallon plastic garbage containers (with lids), one five-gallon bucket, bricks/cement blocks/wood as needed.

1. Remove the ‘drain hose’ (i.e. the rubber hose that comes from the back of your washer) from where it disappears into a hole in your wall.

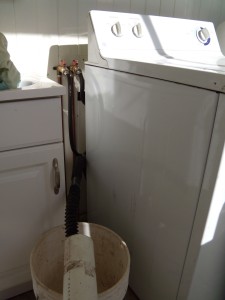
The black drain hose can be seen here extending over the rim of the bucket and inserting into the white PVC pipe.

The black drain hose can be seen here extending over the rim of the bucket and inserting into the white PVC pipe.

2. Insert the drain hose into a length of pipe (ideally, a non-flexible pipe long enough to make it outside without further connections). We used a length of four-inch PVC pipe that measured about 7-8 feet long. We positioned a five-gallon bucket under the ‘connection’ between the pipes (drain hose jammed into PVC). This way, any leaks would go into the bucket rather than onto the floor (there were no leaks!!!).

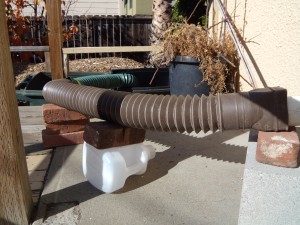
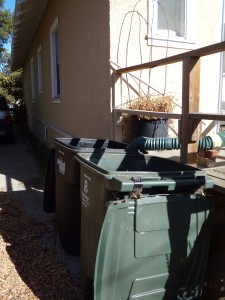
3. We attached two flexible rain gutter extenders to each other and connected them to the end of the PVC pipe to add necessary length and make some turns. We fed the end of the last flexible rain gutter extender into an empty garbage container.

The PVC pipe is on the far right-hand side of the picture. From there, the flexible rain gutter extenders   complete the distance to the just-visible water receptacle off the edge of the porch. We may have an advantage in this regard, as our house is high off the ground.

The PVC pipe is on the far right-hand side of the picture. From there, the flexible rain gutter extenders complete the distance to the just-visible water receptacle off the edge of the porch. We may have an advantage in this regard, as our house is high off the ground.

4. We arranged stacks of cement blocks and bricks under different portions of the piping to ensure that all of the piping went downhill from the washer to the garbage container turned gray water receptacle.

And from another angle...

And from another angle…

The bins, filling up!

The bins, filling up!


Honey Harvest, Winter Preparations and Follower Boards

As I mentioned in my post ‘Fall Blooming Plants for Bees,’ there wasn’t much honey to harvest this fall because our summer nectar flow occurred earlier than usual. In fact, I only took ‘extra’ honey from two colonies out of seven. While four others have some curing nectar and capped honey, they do not have the recommended 3-4 frames of capped honey, and I wonder if they will starve this winter.

It’s tempting to start feeding, but we have adopted the ‘natural selection’ view of beekeeping. The more we interfere, the more we facilitate the propagation of bees that require help to survive. We would rather propagate bees that can adapt to whatever conditions present themselves. Last year, we had one hive with zero stores going into winter that survived. In our climate and in the suburban locales where we keep our hives, the bees can find forage nearly year-round, if it’s not too cold to fly.

The Farmer’s Almanac calls for a bitterly cold winter this year, but the Almanac has been wrong for the last few years. We’ll keep our fingers crossed.

Four of the six hives I inspected through September had excellent populations, and two in particular had excellent brood patterns. Two of the colonies may ultimately dwindle. One had abandoned half of box two to wax moths, and I performed a massive clean-up job. The other seemed abnormally agitated, and their numbers seemed a little small.

I finished rearranging and condensing all the hives by mid-October.

With the use of follower boards, we’ve taken advantage of the ability to condense hives vertically rather than horizontally. For example, we had a small colony last fall that we could have condensed to one brood box, with 10 frames. Instead, we condensed to two brood boxes, with 6 frames each, under the assumption that a small cluster would be more able to move upward to their stores as a group, rather than disbanding to access stores on the outer edges of a box.

Follower boards have the added advantage of allowing for easier frame manipulation. When inspecting a hive, you remove one follower board and about 2″ of space opens up. The common configuration is 8 frames sandwiched between 2 follower boards per 10-frame box.
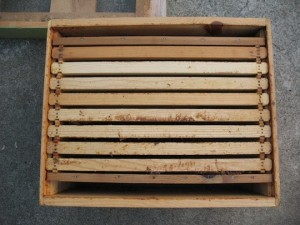
A standard 10-frame Lang box, with 8 frames sandwiched by follower boards.

A standard 10-frame Lang box, with 8 frames sandwiched by follower boards.

For those who haven’t heard of follower boards, they are essentially solid frames. When I made them with a beekeeping friend, we used tongue-in-groove planks cut vertically to size (mediums or deeps). We also cut to size a strip of wood that acted as the top bar, and screwed it into the sections of wood. The ones I buy are made of 1/2″ plywood with solid wood top bars.

Homemade follower board, top; store-bought follower board, bottom.

Homemade follower board, top; store-bought follower board, bottom.

In addition to allowing for a wider variety of hive configurations and making frame manipulation easier, Serge Labesque asserts that follower boards promote air circulation. In theory, air convects upwards from the entrance and screened bottom board between the outermost frames and follower boards and exits through the inner cover out of the nest. Excess moisture is transported out of the hive via this airflow. Further, the space between the outermost frames and follower boards has an insulating effect, protecting the brood nest from extreme heat in summer.

Beekeeping still remains much of a mystery to me. We continue to find whatever balance we can between caring for our bees and interfering with them as little as possible. We want healthy bees, but we don’t want the responsibility to be solely ours. In our struggle, we hope we are helping the bees become stronger.