Monthly Archives: March 2012

The First (Multi-Queen) Swarm of the Year

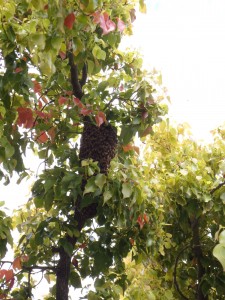
The swarm clustered on a camphor tree branch.

This morning our top-bar hive swarmed, settling in the nearby camphor tree on a branch about 20 feet off the ground over the neighbors’ yard. We panicked of course, unsure what to do first and acutely aware of the possibility that the bees would pick up and leave before we could collect them.

A beekeeper recently told us he’s had luck getting swarms to stay put by slowly clanging metal on metal.  He speculated that the bees are drawn to the vibrations. I grabbed a kitchen pot and ladle and pounded away, while Kelly brought a ladder to set up against the back of our neighbors’ house (and earplugs for herself).

Then we looked up and realized just how high up in the tree the bees were. We decided to call for backup. We lucked out; our good friend (and president of the Beekeepers Guild of San Mateo County) Rick Baxter arrived less than twenty minutes later with all of his awesome swarm-catching paraphernalia in tow.

As it turned out, though, our bee drama was far from simple. We were able to use Rick’s swarm bucket duct-taped to a long PVC pipe to shake down and capture most of the bees from their branch. Unfortunately, after dumping them into a hive in our garden we noticed two disturbing things: first, a large number of bees still buzzed around the branch in the camphor tree, and second, the bees already in the hive gradually moved out the entrance and took off again, heading toward the same neighbors’ front yard.

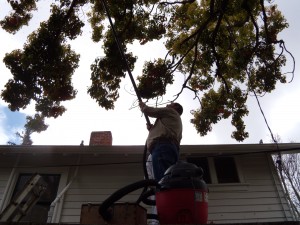
Rick vacuums the last of the bees off the branch to transfer to the hive.

Rick brought out the big guns: a vacuum cleaner that sucks the bees down the long PVC pipe into a wood box, where their fall is cushioned by crumpled paper towels. By the time we got the leftover bees in the camphor tree into the hive, it was apparent that the original group was on the move again.

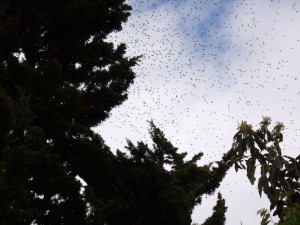
Bees on the go: the bees make their way to a juniper branch.

We stood in the neighbors’ yard and watched as the cloud of bees formed a new cluster on a juniper branch. Another ladder set-up and a good strong shake into the pole-mounted bucket, and we were able to bring these bees back to the hive. Our best guess was that we had missed the queen in our first capture and that the bees had taken off in search of her.

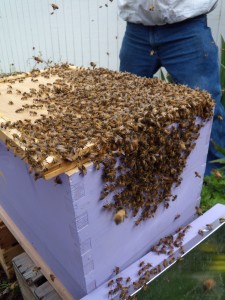
As it turned out, the story was a bit more complicated. As the bees clustered on the outside of the hive, we spotted the queen in the crowd, and Rick nudged her gently toward the opening of the hive. Once the queen is inside, everyone else will follow. But moments later we spotted a second queen, and then a third. In the constantly moving mass of bee bodies it can be hard to know for sure if you’re counting the same queen more than once, but we are confident that we counted at least three individual queens, more likely four to six.

With all the bees back at the new hive, it still took them a while to find their way inside.

This is extremely unusual, but it happened to us last year as well, and we’re concluding that we have some strange bee genetics going on. Ordinarily, a hive will raise multiple queen bees, and the queens fight to the death at birth. The victor becomes the hive’s new queen.

Last June, we found at least eight queens in a single swarm, and though we asked every beekeeper we knew and posted queries on the guild’s beekeeping forum, we found no one who had ever witnessed such a swarm. The hive that swarmed today was originally part of that multi-queen swarm, and it appears the genetics have been passed on.

Garden Record-Keeping

A page from our garden records binder.

I’ve already confessed to being a record-keeping junky, albeit a very disorganized one. When it comes to planting seeds and harvesting vegetables, jotting down notes and weighing produce brings me great satisfaction. But how necessary is garden record-keeping, really?

For Kelly, there is little joy in keeping records, and the only compelling reason to bring along a pencil and notepad on garden workdays is that the records we make today will serve us in some future season.

I’ve seen all manner of record-keeping. When I interned on a two-acre organic farm in Santa Cruz one year, we penciled our spring planting notes into a tattered, water-warped Mead composition notebook. The notebook lived in a greenhouse at one end of the farm, and half the time we pieced our notes together from memory several weeks after sowing. These were fulltime farmers, relying on the farm to sustain them financially.

More recently, volunteering with other Master Gardeners at a local high school, I’ve seen the opposite end of the record-keeping spectrum. In place of an old Mead notebook there are excel spreadsheets, seeding plans, and bed planting guides. There are tables showing days to maturity for different crops, and tables showing the range of soil temperatures in which a particular crop will germinate. There are planting dates for spring crops depending on location within the county.

I must admit I find it all rather thrilling (if also a bit overwhelming). But I have to wonder whether such extensive record keeping is really necessary to grow a big, beautiful, bountiful garden.

I came up with my own record-keeping system last year which falls somewhere between these two extremes, and though Kelly occasionally grumbles when I insist on hearing the details about her greenhouse planting sessions, I think we both agree that having records at our fingertips is helpful.

Among other things, we try to keep track of seeding and transplanting dates, the crop varieties we plant, which raised bed we grow each variety in, and the dates and quantities of our harvests. Our records are far from perfect, or complete, but it’s still good to be able to look back a year later and remind ourselves of the varieties we grew and how they did.

I keep our records in a binder so they are easy to sort and add to. I also like the fact that the binder is easy to bring along on trips to the greenhouse, so we don’t have to enter notes into a computer (though there are obvious arguments for doing this). In addition to recording information on the plants we grow and harvest, I keep another section to log any work we do in the garden. That way, we can look back and know when we built a new raised bed, started compost piles, or weeded the back forty.

Starting Summer Vegetables (at Last!)

Spring onions growing in soil blocks.

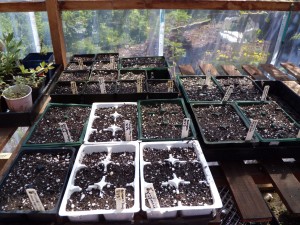
We finally got started planting vegetable seeds in the greenhouse for our summer garden. Although I’m growing starts for a local school garden using soil blocks, our seeds are all in six-packs and four-inch pots.

Soil blocks are basically compressed blocks of planting mix that stand alone in trays and are watered from below. As the plants grow, their roots are “air pruned,” meaning that the seedlings never become root bound. I’m waiting to see how much of a difference I notice with these soil blocked seedlings before investing in soil blockers. In the meantime, our ratty old six-packs work just fine.


Here is our current greenhouse vegetable lineup:

  •  ‘Mild Mesclun Blend’ salad greens (one six-pack)
  •  ‘Heirloom Blend’ lettuce (one six-pack)
  •  ‘Louisiana Long Green’ eggplant (one six-pack)
  •  ‘Olympia Hybrid’ spinach (one six-pack)
  •  ‘Fountain Hybrid’ cucumber  (two four-inch pots with three seeds each)
  •  ‘Bushy Pickling’ cucumber (“”)
  •  ‘Sweet Meat’ Hubbard winter squash (“”)
  •  ‘Eight Ball Hybrid’ summer squash (“”)
  •  ‘Bush Delicata’ winter squash (“”)
  •  ‘Small Sugar’ pumpkin (one four-inch pot with three seeds)

Flowers:

  •  ‘Tangerine Gem’ marigold (one six-pack)
  •  ‘Lemon Gem’ marigold (one six-pack)
  •  ‘Red Gem’ marigold (one six-pack
  •  ‘Whirligig’ zinnia (one six-pack)
  •  ‘Cherry and Ivory’ zinnia (one six-pack)
  •  ‘Art Deco’ zinnia (one six-pack)
  •  ‘Cut and Come Again’ zinnia (one six-pack)

Nearly all of the seeds are from Territorial Seed Company, with the exceptions of the eggplant (from Abundant Life) and the salad greens (from Botanical Interests). We are going to attempt to grow summer greens in the comparatively shady front yard garden. We’ll also be supplementing the above lists with some purchased starts. This has not been a great winter/early spring for garden upkeep and preparation, as every spare moment has been taken up with chicken chores and beekeeping.

Babies in waiting.

Swarm Chasing

A commercial swarm lure product. It gets stapled inside the inner cover of the swarm catcher envelope and all and smells somewhat like lemongrass oil.

This afternoon, in the span of only a few minutes, a huge swarm of honey bees flew into our garden, hovered over the navel orange tree, and then moved on to parts unknown.

Kelly and I had just returned home from work and had collapsed in the living room when we heard a strange sound. To me, it sounded like a very large buzzing insect trapped somewhere in the back of the house, and I didn’t pay it much attention. A minute later, the phone rang with what we now know was a call from a neighbor alerting us to a large mass of bees hovering over the orange tree.

By the time we meandered outside half an hour later to admire the raspberry vines’ new growth and complain together over the prematurely bolting cabbage, all signs of the swarm had past. But in the midst of our garden reverie, the same neighbor stuck her head over the fence and asked if we had caught the swarm of honey bees over the orange tree. The what?!?

We made a quick tour of the garden, just in case we had somehow overlooked a large cloud of bees. We scanned our top-bar hive, wondering if they had just run off to greener pastures, but all appeared normal. Next we speed-walked through our neighbors’ garden to the spot where they have generously allowed us to place a swarm catcher on their wisteria trellis. No bees.

What came next speaks volumes about our personalities as well as, I’m sure, our naiveté as beekeepers and swarm catchers. We put on our jackets, jumped in the car and, with the windows rolled down, drove very slowly through the neighborhood, heads out the windows, listening and watching for any sign of a swarm.

Given today’s experience, I can tell you that suburban white noise sounds an awful lot like bees in the distance. Especially when you really want it to. We stopped the car multiple time and walked down streets, only to find that the buzz we’d been sure we heard was really a clothes dryer, or a car engine, or our own imaginations.

When we had finally given up on finding the swarm and were on our way home, we drove past a feral hive in an oak tree about a block from our house. We’ve been keeping tabs on this hive since last year, taking walks to peer up at the telltale stream of honey bees going in and out of a rotting sawed-off limb. Today, the scar on the tree was completely covered by a mass of bees, and we strongly suspect that it was this hive that swarmed, leaving behind a group of bees to keep the oak tree hive going.

Oddly enough, there is rain forecast for tomorrow, and this afternoon was overcast and windy. We can’t quite figure out why a swarm of bees would take to the sky with foul weather brewing, and we joked that maybe we wouldn’t have wanted these bees anyway, if they were willing to swarm at such a seemingly poor time. Still, as earnest swarm catching wannabes, it’s hard not to feel bitterly disappointed that we sat unwittingly by on our sofa while a swarm congregated outside and then passed by our carefully prepared swarm catcher, with its daub of lemongrass oil, in favor of some other home.


Rooftop Beekeeping

The rooftop swarm catcher.

Urban beekeepers often practice rooftop beekeeping in places where space is tight. Keeping bees on the roof is also a great way to lift hives out of the deep shade often created by buildings and vegetation.  It’s not great for beekeepers who are afraid of heights.

This past Saturday, under a sky heavy with rain clouds, Kelly and I paid a visit to one of our new beehive hosts. At this particular location, we had decided on our preliminary visit that the nearly flat roof was the best spot for bees. But ferrying our supplies onto the roof via Kelly’s eight-foot pruning ladder was a sobering ordeal, and the thought of bringing full honey supers down from the roof makes this beekeeper quake in her boots.

Safely on the roof, we set up one swarm catcher complete with a pheromone lure, and leveled the box with scrap wood stacked up on the slight incline. The homeowner has kindly offered to install screw eyes to anchor the hives so that, in the event of a California temblor, our hive won’t go pitching off the edge.

Our second stop of the day was much less scary: a nice flat garden with overhanging oak trees. For this swarm trap installation, we set up a low stand of stacked cinder blocks, followed by a metal bar and wood contraption to deter ants, and placed the bee box on top.

Keeping ants out of the beehives

With the box securely resting on the stand, I used a paintbrush to apply canola oil to the metal bars. Honey-seeking ants can’t make it across this slick surface. Deterring ants is especially important for newly established honey bee colonies, which may not be strong enough to fend off insect invasions. We have heard more seasoned beekeepers describe losing hives to ants, though our own experience last year was far less dramatic. While we did see ants around the hives on several occasions, hand squishing the ones we could find and placing a few borax ant traps around the bases of the hives did the trick.

The swarm catcher sits on metal bars coated in oil to deter ants.

How to lure bees

We used commercial pheromone lures in the swarm catchers we placed this past weekend, but we’ve also purchased a small bottle of lemongrass oil, and we are including some nice stinky beeswax in each swarm catcher. Our plan is to test out the lemongrass oil versus commercial lures to see if we notice a difference in our success rate. Our apiary and swarm catching enterprise is so small scale that it will be impossible to know with any certainty what approach is more successful, but we are excited to experiment.

Here is a swarm lure stapled to the inner cover of the hive.

Fruit Flies in the Worm Bin

Kelly's vinegar trap full of fruit flies.

There are fruit flies in the worm bin. Tons of them. I get a face-full of flies each time I feed the worms. This might not matter very much, aside from the fact that the red wigglers have been snacking cozily in their back bathroom worm bin since last fall, when I brought them in out of the cold and gave them stern instructions to mate like mad all winter long.

Now, the fruit flies have spread from the worm bin to the rest of the house, and try as we may to keep the kitchen sink and counters clean of tempting morsels, the flies seem to find enough to stick around (and sire new generations). Kelly set out a bowl of cider vinegar, which traps a good number, but the plague continues.

Kelly has asked more than once (and quite patiently, I might add) if it might be warm enough for the worms to move back outside, but I’ve resisted, worried that a late cold snap could put a dent in their reproductive cycle. If I hadn’t been so busy with other gardening endeavors, I might have acted sooner to put a stop to the fruit fly breeding party; a trick gleaned from the twelve-week county composting class I took last spring has been nagging at the corners of my mind.

The idea is simple: place layers of newspaper over the compost in the top worm bin and tuck it in snuggly around the edges. The newspaper blanket keeps the fruit fly from accessing food in the bin, effectively halting reproduction.

It sounds simple enough. Now I think I’ll go do it.

Backyard Coop Construction and Chicken Philosophy

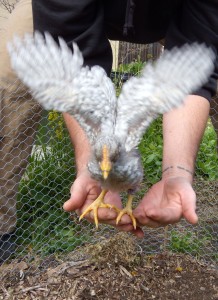
Fiona, the Leghorn, showing off her new grown-up wings.

Have I mentioned that chicks grow quickly? The Leghorn and Barred Rock flock is fast outgrowing its box. The chicks have taken to flying the length of it, and have recently mastered the art of spilling their water dish, much to our dismay.

We worked an eight-hour day on Saturday buying building supplies and beginning coop construction. We ended the day after dark, our headlamps faintly illuminating the gloom as we frantically screwed 2x4s and sawed lumber.

We were at it again this afternoon, and I have to say that I’m really impressed with our progress. Despite multiple miscalculations and three separate trips to the hardware store in which we puzzled for what seemed like hours over bracket configurations, screw lengths, and our illegible diagram, we’ve almost completed the coop frame. Kelly had the good sense to suggest calling it a night today at 7:30, when we discovered we had miscounted our t-brackets yet again and will need to make another trip to the store.

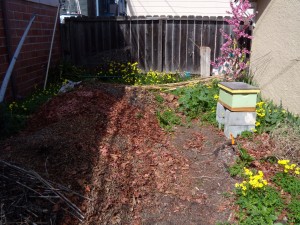
From massive leaf pile, swarm catcher, and concrete rubble mound...

...to leveled ground and a 7'x14' coop frame.

Still, the bare bones of the chicken coop look so good that we discovered we had both started fantasizing about turning it into an art studio instead. So much for chickens.

While the chicks remain confined to their cardboard box, they have a new play structure to keep them occupied. Kelly constructed it today, fashioning a loft, a roost, and a chicken ladder out of scraps of wood. The girls appeared pleased, and very interested, and I’m struck yet again by how smart chickens seem compared to their reputation.

I had a similar experience when raising rabbits years ago. Contrary to the stupidity I expected to see in them, I found my rabbits to be not only highly capable and engaging, but also wise. Perhaps this sounds like a strange choice of words, but I came away utterly convinced of their wisdom and decency. I feel quite certain that I would be a better human being if I possessed what seems to come so naturally to animals, that is, complete focus on being a creature of my kind in the world. The rabbits had it, the bees have it, and now I see it in the chicks as well.

Please excuse my tangential philosophizing. In short, the coop is half completed, and the chickens are growing faster than I could have imagined!

Who says chickens don't like ladders?!

Swarm Catching for Newbies

A swarm catcher in our backyard orchard.

The hive-swarming season is upon us, and in an effort to support natural bee genetic adaptation (and save money!), we are hoping to populate nearly all of our hives via swarms. This week we resurrected bee equipment from the basement freezer, ran an inventory of our boxes, frames, and bars, and set up two “swarm catchers”.

So what’s a swarm catcher? Take one bee box, fill it with the smelliest, most well-used comb you’ve got, add a little lemongrass oil on the end of a Q-tip (or a commercially produced synthetic pheromone packet), and wait for a swarm to move in.

Everyone’s seen illustrations of an angry swarm of bees chasing after some poor soul. In reality, swarms are generally quite mellow. The bees have gorged on honey to prepare them for the journey, and they’re intent on taking care of the queen and finding a new home. While the swarm waits, often clinging to a tree branch, scout bees search for a good place to call home.

And then, through some magic of bee pheromone communication and butt-wiggling, the swarm agrees on one location and moves en masse to their new hive. I don’t use the word “agrees” lightly. I’m keen to check out a new book by Dr. Thomas Seeley, of Cornell University. Seeley’s book, Honeybee Democracy, explores the fascinating and complex ways in which bees communicate and make group decisions. I continue to be amazed by the intricacy of honey bee social structure and behavior.

Setting up lures

So far we’ve set up two swarm lures. The first is in our backyard “orchard,” future site of a chicken coop for the fast-growing girls. The second swarm catcher is about eight feet off the ground on our neighbors’ wisteria trellis. We picked up some lemongrass oil from the store, wetted the ends of Q-tips , and placed these across the frames at the back of the hive. Supposedly, the lemongrass scent is similar to queen bee pheromones, thus enticing scout bees to give a favorable report of the location.

You can just make out the swarm catcher perched on this trellis. As always, click on the picture for a closer look.

This swarm catcher is ready to go, with a "magic" Q-tip visible on the right side of the frames.

Over the past two weekends, we’ve gone on field trips to six potential hive-hosting gardens, and we plan to set up swarm catchers soon in many of them. The only problem is our lack of equipment. We spent hours counting and re-counting our boxes, frames, bars, and wax foundation sheets and poring over our Mann Lake beekeeping supply catalogue.

Kelly placed the order yesterday morning and was initially told that we would need a forklift on site to receive it. She informed the operator that this is a private suburban residence without access to forklifts. Sheesh. I hadn’t realized that ordering supplies for half a dozen hives was such an involved process. Fortunately, it sounds as though they are willing to deliver sans forklift.

Top-bar hive takes on the world

We went out in the garden tonight and looked up with a flashlight into our top-bar hive through its screened bottom. We were wowed by the number of bees. We estimate that the population has tripled since the last time we looked at night, several weeks ago. The bees have drawn new white comb from the top-bars we added, and they are entirely covering the other combs, so that the whole inside of the hive looks like a huge ball of bees.

The next warm day we have, we’ll open the hive and take out the divider board that has been limiting the bees to the right-hand side. We are also considering the possibility of splitting the hive as spring progresses if the bees don’t beat us to it by swarming.

Deferred Garden Maintenance

Under the kohlrabi, spring is in the air.

Spring is always a busy time of year in the garden, but this year is far worse than normal for us. Not only are we speed parenting four chicks (blink and they’ve hit chicken adolescence), we’re also aiming to more than double the size of last year’s apiary.

In the midst of such exciting and demanding pursuits, we are neglecting other garden tasks. Planting starts for spring and summer veggies comes to mind, as well as finding a home for forgotten greenhouse babies and weeding what has become a jungle of chickweed and miner’s lettuce in the cole crop bed (not to mention the carrot patch, which is no longer visible to the untrained eye).

It’s at times like this we ask ourselves if our gardening efforts are really worthwhile given the limited time we have to spend in the garden, and whether we are certifiably insane for continuing to take on new projects. But alas, we are true garden addicts, and we can’t help ourselves. Instead, we wade through weeds, wring our hands, and muster the strength to go on.

This weekend, I made a feeble attempt to right some of our garden wrongs. On Friday I planted out two leftover six-packs of beets given to me at the school garden where I volunteer. I also planted out half a flat of ‘Red Bull’ onion starts. Yes, it is quite late. Yes, they were seeded in September and are looking pretty stunted and forlorn, but I couldn’t bear to compost them. They will join the list of vegetables subjected to my plant abuse survival testing.

On Saturday, I filled a new raised bed with last year’s compost and several bags of store-bought soil (ugh!) and planted out 21 bare root ‘Albion’ strawberries and 7 ‘Seascape ‘ strawberries. The strawberry bed is directly in front of our top-bar hive, which, with the onset of truly warm weather, is going gangbusters.  For the first time ever with this hive, I had to literally race around the garden to get one particularly territorial bee off my trail.

The new strawberry bed, ready to plant. The 'Santa Rosa' plum is in full flower on the right side of the frame.

I followed up my strawberry planting with a kohlrabi, cauliflower, and broccoli weeding session, thinned the fall-planted beets, and limped inside for dinner.

For her part, Kelly has been astonishingly productive in the garden on her one day off a week. Most recently, she pruned, weeded, and mulched the raspberries, and erected wires and t-posts to train the vines. She has also been the superstar of the bee equipment inventory process, figuring how many boxes we need to catch swarms and establish hives, and where those hives will ultimately live.

If we make it through the next month of coop building, hive assembling, and seed planting, I think we’ll have a decent shot at coming out on top. In the meantime we’ll be relying on plenty of chocolate and our senses of humor to get us through.

Mealworms Join the Livestock Lineup

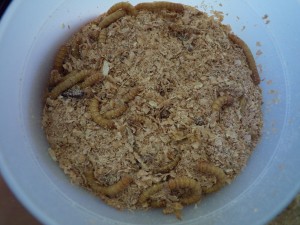
This is what 500 mealworms in a cup of bran look like (click on the picture to see them up close and personal).

Today we added 1,000 mealworms to our menagerie. The reason? Chickens love mealworms. I’m not completely convinced that raising mealworms for the chicks to snack on is a worthwhile endeavor. It seems like there are plenty of tasty morsels raising themselves in the garden. So far, we’ve scavenged sow bugs, slugs, and snails for the chicks to try. I haven’t been able to bring myself to toss in any hapless compost worms, but I’m told that chickens love these, too, and that they are actually more nutritious than mealworms.

Oh well. The deed is done, and the mealworms are installed in a plastic tub with a window screen covering to (hopefully) ensure that no moths gain entrance and no mealworm beetles have free range of the house. Perhaps I’ll get used to them, but so far I’m not a fan of mealworms. They are too fleshy looking, too creepy crawly. They strike me as land-dwelling bottom feeders. Thus, I was surprised and repulsed to read that some folks eat mealworms. I guess if we ever have to start living off the backyard land…

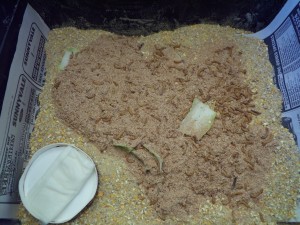
In the meantime, I’m feeding the mealworms. They’ll eat either bran, or chicken mash (ours are on mash). They also need a chunk of produce, cabbage in our case, to add a little moisture to their environment. Since they prefer humidity around 70%, I also supplied them with a few damp paper napkins folded inside an old ice cream lid.

Supposedly the whole getup will not smell, as long as there is no buildup of dead worms. In theory this shouldn’t be an issue, since they are cannibalistic when given the opportunity. Unlike the Internet sources I found, which suggested sifting out frass (worm poop) and dead beetles periodically, the vet told us that there’s no need to clean out the tub, since the worms and adult beetles munch on everything from grain, to dead comrades and frass.

1,000 mealworms enjoying their new home.