Monthly Archives: January 2012

Leafy Green Potatoes

I love potatoes as much as anyone out there. In fact, Kelly and I have four different varieties awaiting harvest in the garden as I write this. But I’m not sure I’d call potatoes a vegetable in the leafy green, all-you-can-eat, unquestionably healthy sense.

Neither, as it turns out, would Michelle Obama, who has been working to change the nutrition guidelines for school lunches. Predictably enough, the potato industry was none too pleased at proposals last year to limit school lunch servings of the popular starch. As with most political issues these days, science and reason seem to be taking a backseat to lobbyist agendas and profits.

The final version of the new rules for government-subsidized school lunches lifts limitations on potato servings, as well as allowing tomato paste to count as a vegetable serving. Hmmm.

But removing the proposed restrictions from the final draft wasn’t enough for the potato industry. I got a good laugh out of a New York Times quote from Mark Szymanski, a spokesman for the National Potato Council. Said Szymanski, “We still feel like the potato is being downplayed in favor of other vegetables in the new guidelines.” He went on to complain that potatoes are being pegged as “second-class vegetables.”

News like this makes me question whether attempting to effect change in the US is a worthwhile endeavor. Perhaps it’s time for me to pick up shop and go grow potatoes (and other real vegetables) in Canada.

Garlic White Rot, Anyone?

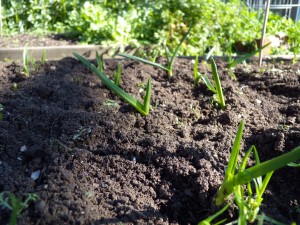
A few newly weeded, super-cute, disease-free (knock on wood) garlic plants.

I love garlic. With a harvest of just four garlic braids last year, I decided we needed to ramp up production. In fact, I set a goal of growing a year’s supply of garlic this winter. I think we’re going to fall a bit short of the mark, but I’m pleased to report that we do have one long raised bed devoted to garlic and onions.

I’ve never known much about garlic diseases, and I’ve always had healthy alliums. This past weekend, however, I overheard talk of garlic white rot. By the fearful tenor of the gardener doing the talking, I decided this might be a disease worth looking up.

I didn’t have to look far. Sclerotium cepivorum, the fungus that causes white rot, can quickly kill garlic and onion plants. First the plant’s leaves turn yellow and die back. Then the bulb begins to rot. Apparently at this stage, it’s very easy to pull up the garlic, and you’ll find telltale white fluff on the bulb. The fluff later becomes more compact, forming black pinhead-sized sclerotia.

Pinhead-sized What? 

In laymen’s terms, sclerotia are hardened fungal bodies that allow the fungus to survive tough times. For garlic white rot, this means that the fungus can live in the ground for upwards of thirty years without food, just waiting for the next garlic or onion planting to feed on. I shudder to think of waiting thirty years to grow garlic again.

Of course you don’t have to wait that long to plant again, and there are a number of treatment methods available to farmers. According to UC Davis, however, chemical treatments are necessary in order to grow alliums once soil is infected with white rot.

I’m no expert on any of this, but what I found most sobering was the thought that I could inadvertently introduce white rot through planting infected garlic sets and then be stuck with the disease for the rest of my gardening life.

Aside from planting garlic from seed, which sounds like a pain to me, there are a number of prevention and organic management options, all boasting imperfect results. For instance, it’s possible to dip cloves in hot water before planting with the hope of killing off the fungus. If your soil is already infected, you can plant bunching onions. They’ll trigger the sclerotia to germinate, but won’t allow time for new sclerotia to form before harvest.

I guess the moral of the story for those of us lucky enough to have avoided the disease thus far is to be extremely cautious about where we get our garlic sets, or to plant from seed. Planting leftover cloves from the grocery store is probably a terrible idea, given that there’s no way of knowing the garlic’s origins, let alone the condition of the soil in which it grew.

But what about planting sets from a nursery? For the past several years, we’ve purchased sets from Common Ground, a local organic nursery. I’ve also saved and replanted my own elephant garlic, since I find the sets unpalatably spendy.

I spent a few hours this morning doing some long-overdue weeding in the allium bed. So overdue in fact, that plant excavation might be a more appropriate description. So far, thankfully, my little alliums look healthy despite their gardener’s lack of attention to the threat of white rot. Whether I’ll continue planting nursery sets without further precaution next year, I haven’t yet decided. At this point, I can’t see myself planting a year’s garlic from seed, but from what little I’ve learned of white rot, I’d hate for laziness to be my folly.

Before the excavation.

After the excavation.

In Praise of Fava Beans

Fava beans in flower.

A few weekends ago, while volunteering at a local school garden, I overheard someone complain that favas are ugly beans. While she conceded that they make a good foolproof crop for kids to grow, she said she never plants them herself.

I was surprised and vaguely wounded on behalf of favas, but I took a deep breath and stepped up to their defense. Personally, I find fava beans quite visually stunning, with their erect stature and silvery foliage. I am particularly partial to the sight of a stand of Favas in early morning light with a good dose of dew.

But beyond their visual merits, favas have a venerable history as world travelers, and a lot to offer in the garden.

 Cover cropping

Like all members of the legume family, favas fix nitrogen in the soil. This makes them invaluable as a cover crop, planted to rejuvenate the soil’s nutrients and structure. To take advantage of nitrogen fixation, it’s important to cut the plant before the beans form. According to John Jeavons’ How to Grow More Vegetables, legumes should be cut when they are at 10% to 50% flower.

For green manures, simply cut the favas up and dig them into the soil, allowing several months for decomposition before planting. Another option is to cut the plants at the base, leaving the roots intact, and include the plants in your next batch of compost. I favor this second approach, in large part because it allows me to get my next crop in the ground quickly.

If you allow the beans to mature, the dead plants can be used as a high-carbon addition to your next compost pile.

Eat the beans!

Fava beans are good fresh or dried. They make Jeavons’ list of “significant-calorie-producing” crops. It’s important to note that some people are deathly allergic to this type of bean, suffering from a condition commonly referred to as favism (no joke!). It’s also interesting to note that fava beans shouldn’t be fed to chickens, as this negatively impacts the birds’ metabolism, growth rate, and feed efficiency. That being said, favas are commonly eaten by people in many parts of the world and are protein superheroes in the vegetable kingdom.

Frost tolerance 

Favas can hang in there at temperatures of 21 degrees Fahrenheit and lower, depending on the variety. If you plan to eat the beans, the general recommendation is to plant in February or March. For cover cropping, plant in September through November. This year, I got the beans in the ground in October, and they’re coming along nicely.

Bee food?

We won’t claim it’s their favorite food source, but our bees have definitely checked out the fava flowers this winter. Kelly recently reported what she described as a “frustrated looking bee” attempting to navigate into a fava blossom.

According to one source I found, honey bees are unable to access nectar through the front of the flower, and must go around to the back instead. However, a number of studies have found honey bees to be important fava pollinators.

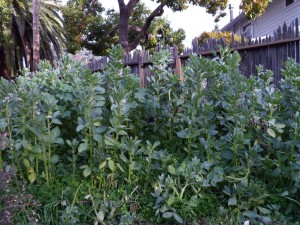
A stand of fava beans--not quite the dewy morning light I love, but beautiful nonetheless.

What is Natural Beekeeping, Anyway? Part One

A front view of our now deceased Kenyan style top-bar hive in happier times.

In general, Kelly and I believe in following organic practices in the garden. When we started keeping bees it seemed like an obvious leap to use organic, “natural” beekeeping practices. But what does it really mean to keep bees naturally? And what compromises (if any) are we willing to make to keep our bees alive?

These are questions we’ve come up against repeatedly in our first year of beekeeping, and we’re still trying to define what terms like “natural” really mean in this context.

At a recent meeting of the Beekeepers Guild of San Mateo County (of which we are proud members), an informal poll showed a wide range of hive losses for this winter. While several members still had all their hives, the vast majority had lost at least a few, and many had experienced losses of between 40% and 100%.

I should stop here and clarify that many of these beekeepers have decades of experience under their belts and keep anywhere from a few, to a few hundred hives. They also run the gamut from super-treaters (those who use whatever chemicals are available), to strictly organic, or even hands-off. Interestingly, among guild members, no strong correlation between treatment approach and hive success exists.

Natural beekeepers unite (and try to figure out what they stand for)

Recently we’ve also been attending meetings of a fledgling subgroup of the guild focused exclusively on natural beekeeping (whatever that is).  I think the group would be hard-pressed to agree on a single definition. Some of us are willing to use essential oils or powdered sugar to treat for Varroa mites, while others feel that until we allow bees to truly fend for themselves, we’re meddling with the evolutionary process that could ultimately free bees from a dependency on human intervention.

Kelly and I seem to be coming down on this second side of the argument, but it’s easier said than done. We know we don’t want to perpetuate a weak gene pool, but we also want our bees to live.

One of the many complicating factors in the equation is that bees don’t live in a vacuum. Over half the hives in the US are trucked to California each winter for almond pollination, bringing with them a host of viruses, and pests.

Many beekeepers, especially the hobbyists so common in urban and suburban areas, don’t breed their own bees. When a hive dies they often replace it with a new package of commercial bees the next spring.  This means that those of us who might prefer to let bees work things out themselves face an overwhelming obstacle; suburban communities like those in the Bay Area face a huge influx of bee packages each spring, primarily from the same few breeders.

Almost all commercial bee-breeders use chemical treatments to keep their bees alive, and their primary aim is to produce bees that are good-natured, mega honey-producing, egg-layers, not bees that can survive Varroa mites, viruses, and now a deadly, parasitic fly, unaided by chemical treatments.

Where do we go from here?

Given current bee-breeding practices and the prevalent beekeeping culture, beekeepers that try to let nature run its course may not make much of a difference in the bee genetics flying around.

Still, Kelly and I are giving it a shot. We’ve resolved to take a very hands-off approach with our hives. We’re not treating for mites, and we’re reluctant to feed. We’re also reluctant to buy any more packages and are exploring options for acquiring swarms and rescue colonies this spring.

We’re crossing our fingers that our last remaining top-bar hive, Mondo, will survive the winter, and I wonder whether our anti-treatment stance may soften if we lose it.

Overwintering Compost Worms, or Hawaii for Red Wigglers

I have worms living in my bathroom. Yup, you read that right. When the nights started turning cold this fall, I negotiated with Kelly for some worm space in the back bathroom. The back bathroom is also home to Pudy’s litter box, our bee suits, my hanging produce scale, and a rotating lineup of anything else that we at one point felt the need to shove out of sight quickly.

In our mild Bay Area climate, red wigglers can survive just fine outside for the winter. All they need is shelter from the rain (to make sure they don’t build up excess moisture), and a diminished supply of food. The thing is, even though they survive, the worms do slow down in the colder temperatures. So if you’d hoped to dump your Thanksgiving leftovers in the bin, you may be in for a rude surprise when the worms don’t chow fast enough and you end up with a rotting, stinking mess.

The other area where red worms slow down is reproduction. This was my main concern because, though I have other ways to compost my kitchen scraps through the winter, it’s important to me that the worms continue building their numbers. I’ve admitted before to being a cheapskate, and investing in worms is no exception.

When I decided to get my worm bin back up and running last spring, I begged a small population of worms off some friends and have been coaxing them along ever since.

I also discovered that there were considerable (if quite dispersed) populations of red worms that found their own way to my freestanding compost piles, as well as (somehow) into my compost tumbler.  When I’m feeling overzealous, I go out with a little pail and hunt for worms to relocate to the worm bin.

In preparation for the worm winter vacation, I spread a plastic garbage bag in the corner of the bathroom in case of any bin leakage. On top of this, I positioned a plastic crate to get the bin off the floor and seated the bin on top. I lined up a quart canning jar under the bin’s drainage hole to catch the slow drip of “worm tea.”


The setup.

Good news: Three months in, and the worms are doing fine. Their numbers seem to have increased, and the worm castings are building up. In fact, just last week I added the bin’s third tray.

There’s no noxious odor and no issue with fruit flies. A guest who recently used the back bathroom didn’t even realize she was sitting next to a bin of worms and decomposing produce. She decided the whole getup was a “gravel sifter.” Go figure.

The worm’s winter diet has thus far consisted largely of rotting apples and overripe persimmons. I’ve also added a fair bit of lettuce and other vegetable scraps. Ultimately, I’d like to be able to compost the majority of appropriate kitchen and table scraps in the worm bin, but at this point I’m still worried about overwhelming their population size with too much food.

The newest tray of food scraps and shredded paper.

Backyard Chickens: Climbing the Evolutionary Ladder

Here's the orchard, pre chicken coop. The nectarine and peach trees can be seen on the right, against the back wall of the garage. The brick wall on the left is a neighboring apartment building.

We’ve wanted chickens for years. Overwhelmed with bees this past spring, and afraid the landlords would say no and break our little gardeners’ hearts, we put off having the discussion. Instead, we spent long hours late at night plotting the best approach, did research, and tried to anticipate landlord concerns, as well as solutions we could propose.

To our great surprise and delight, their response was much more positive than we had anticipated, and we are now in the throes of chicken planning.

That’s right, the bees didn’t provide enough parental stress and drama, so we’re climbing the evolutionary ladder. We will soon be chicken-mamas.

As with the majority of our garden dreams and projects, this one is slated to live in “the orchard,” a little square plot behind the garage. Last year we planted nectarine and peach trees there, and we’re now figuring out how to protect them from the future chickens.

We’re still debating chicken breeds. Australorps have repeatedly come up in our discussions, largely because of their record egg laying and supposedly mellow temperament. Other than choosing a breed, or breeds (we’ll have three birds to start), all we need is a coop/run. We’re shooting for something that will keep our birds safe from predators at night, but which is big enough that they won’t be miserable if they need to live there full time for a while.

Knowing us, we’ll probably finish building the coop some Saturday in June when we have full-grown hens still living in a box in our kitchen. But in the spirit of anti-procrastination, I’m pushing for a trip to the hardware store tomorrow morning.

Who’s Afraid of Varroa Mites?

Inspecting our original Langstroth hive.

This past April, we became the proud keepers of two beehives. It was puppy love from the start. We fretted and made late-night visits armed with flashlights to peer up into the hives. Tensions were often high during inspections; we were petrified that a wrong move might hurt the bees.  By summer, a multi-queen swarm from our Langstroth hive bumped us up to four hives, and we were feeling pretty pleased.

Beekeeping is a humbling and emotionally depleting experience at our house. There’s a reason we nicknamed our first harvest “heartbreak honey.” Long story short, between the end of September and the middle of November, we lost three hives. We’re told that the true season for losing hives has only just begun, and we’re clinging to some faint hope that Mondo, our remaining top-bar hive, will make it through the winter.

We’ve been doing some sort-of-weekly, highly scientific mite counts, and saw the number of varroa mites on Mondo’s bottom board skyrocket in December. This past week the number of mites seemed to be down slightly, but Kelly swore she saw bee eggs on the board.

Bee eggs? Yes. She swore they were indeed bee eggs. I went for the magnifying glass, upgraded to my loupe, and finally agreed.

Furthermore, we found what appeared to be baby bee antennae. They look like tiny strings of pearls in amongst the mites, eggs, and clumps of pollen on the board. Whether this is a sign of hygienic behavior, queen trouble, mite overload, or something else, we’ve little idea, but we’ll keep rooting for this hive and crossing our fingers.

Mondo and my pickling cucumber in early summer. We designed and built this top-bar hive the day our Langstroth swarmed!

Mulch Madness

Kelly spreads newspaper under the loquat.

We started collecting leaves a year ago in the fall. We made great heaps of them in what we fondly call the orchard––a square little plot sandwiched between the garage and back fence where we always imagine our next garden project will live.

We had grand schemes for the leaves, but our eyes were bigger than our rakes.

I wanted to make compost piles, and did, much to Kelly’s chagrin. She came home from work one day to discover that I’d used up nearly a quarter of our store.

Kelly dreamed of sheet mulching. Done right, the layers of compost, cardboard, and leaves do a great job of building organic matter in the soil and improving water penetration and retention.

Sheet mulch can also help snuff out annual weeds, a big added benefit in our garden, where we are perpetually behind in our efforts to keep growing space open for the plants we’re actually trying to grow.

Kelly’s plan went like this: we’d start by mulching the weedy garden paths with layers of cardboard and woodchips supplied by our arborist friend. Then we’d work our way around to the front of the house, a no-man’s land of Bermuda grass, ivy, and straggly roses. Finally, we’d circle back along the driveway, filling in compost, cardboard, and leaves under the apple, lemon and persimmon trees. In the end, we ran out of time before we used up our leaves, or woodchips.

This year, however, we were at it again. We got an earlier start, enlisted the help of rake-happy neighbors, and befriended a mow-and-blow team one day that gladly dumped a truckload of leaves (mixed with assorted trash) against the front of the house.

You can’t go far in the garden anymore without tripping over a pile of leaves, and thus the mulch preparation began. You should know two things before I go any further. The first is that we have very little time to work in the garden. We both work more or less full time and we’re chronically overcommitted homebodies.

The second thing you should know is that we don’t want to work harder than we have to. We derive immense satisfaction from surveying our handiwork at the end of the day, but we’re often less than enthusiastic about actually starting big projects.

That said, we dug out the Bermuda grass and ivy (ha!) in the front yard and removed several stubbornly rooted oak saplings, along with all but the most pleasing straggly rose.

In a feat of unparalleled daring (for me), I climbed 25 feet up in an as yet unidentified weed tree and performed some merciless branch removal to bring more light into the front yard.

As lazy, cheapskate gardeners lacking adequate resources, we decided to forgo the layer of compost. (We’ll be sure to let you know how this works out.) We went straight to spreading the cardboard instead. We quickly used up our supply of boxes, and resorted to a mat of overlapping newspaper under the loquat. We topped the whole thing off with a generous layer of leaves. Now all we need is the rain.

The completed mulching.

Next fall, when the weeds have (hopefully) been subdued, the leaves and cardboard have broken down into the soil, and the worms have discovered what an awesome place our front yard is to raise a family, we’ll have to come to a joint decision on what to plant.

My short-list includes Jerusalem artichokes, blueberries, a raised bed of greens, and space for active compost piles. Kelly is hoping for a home for the ornamentals she loves. To be fair, though, the blueberries were her idea, and she’s even on board with the bed of greens as long as I’m willing to forgo a sunchoke forest and tuck my compost bins around the side of the house.